How to Create an Employee Directory in SharePoint Online (with Examples)
By Trent Allday, Founder, Sprocket 365
Employee Directory in SharePoint Online
An effective employee directory is a common requirement for digital workplaces. It matters even more now that so many people work remotely and need quick access to colleague details, contact information and the org structure.
SharePoint offers some basic workarounds out of the box, and we cover those below. For a fully searchable, filterable directory with an org chart, you will want a purpose-built web part. This guide walks through both paths, step by step, with real examples.
Build your own employee directory in SharePoint today! 🧰
What is an Employee Directory?
An employee directory (you will also hear "staff directory" or "people directory", they mean the same thing) is a searchable listing of an organisation's people and their basic information: names, job titles, departments, locations and contact details.
It serves as a centralised resource where anyone can find who does what, who reports to whom, and how to reach them.
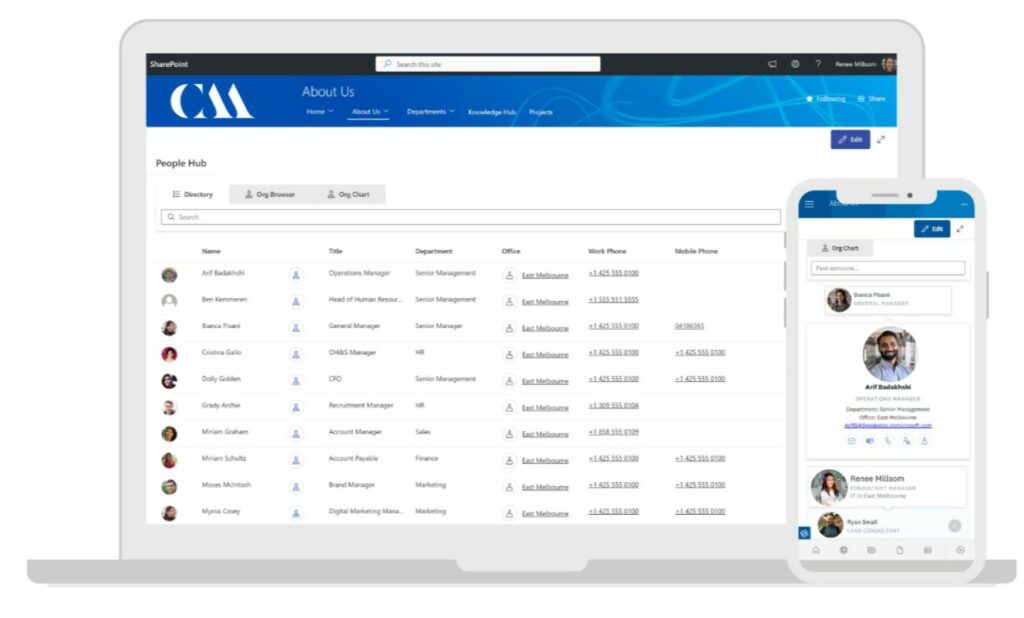
People Hub by Sprocket 365
What can SharePoint and Microsoft 365 do out of the box?
Before adding anything, it is worth knowing what Microsoft 365 already gives you and where each option falls short:
- The People web part shows a hand-picked set of profiles on a page. It works for a small leadership section, but you maintain the list manually and there is no search, filtering or org chart.
- SharePoint search can surface people results, but the experience is generic. There is no browsable A to Z directory and no way to filter by department or location.
- Microsoft 365 profile cards (the pop-up when you hover on a name in Outlook or Teams) are handy for one person at a time, but they are not a directory you can browse.
- The org chart in Teams shows reporting lines for one person at a time and depends entirely on the manager field being populated. There is no whole-of-organisation view.
Each option covers a slice of the need. None of them gives you a single searchable directory with photos, filters and a full organisational chart on your intranet. That is the gap the People Hub fills.
Where does the data come from?
The People Hub reads directly from your Microsoft 365 profiles (Microsoft Entra ID, formerly Azure AD). Names, job titles, departments, managers, phone numbers and photos all come from the profile data your organisation already maintains.
That has two practical benefits:
- No second system to maintain. Update a job title in Microsoft 365 and the directory reflects it automatically. There is no separate list to keep in sync.
- Your data never leaves your tenant. The web part runs inside SharePoint and reads your existing profile data. Nothing is copied to an external service.
One tip before you start: the directory is only as good as the profile data behind it. Five minutes checking that job titles, departments and manager fields are populated in Microsoft 365 pays off immediately.
How to create an Employee Directory with Sprocket 365
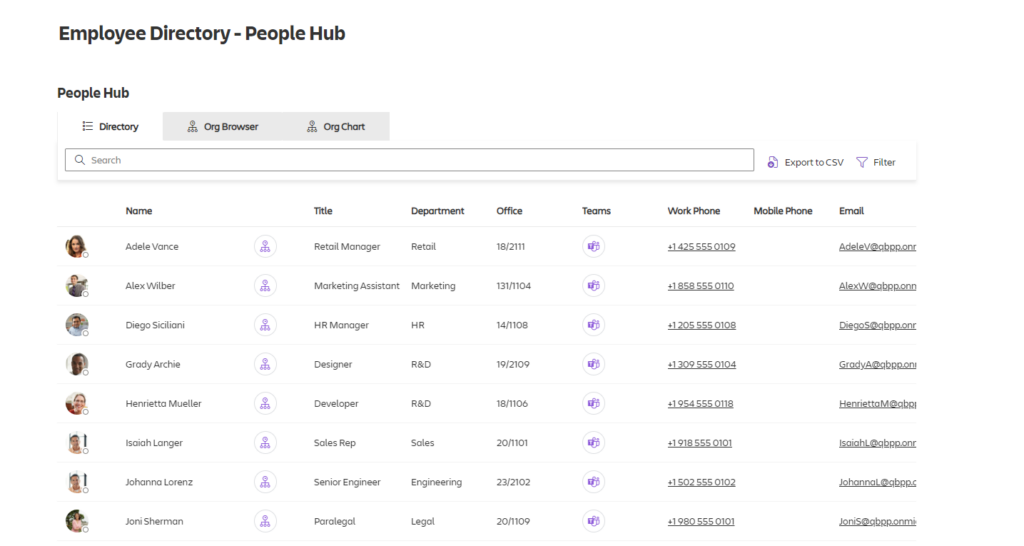
The People Hub by Sprocket 365 is an interactive organisational chart and staff directory, complete with profile pictures and essential contact information.
Here's a straightforward guide on how to integrate this feature into your SharePoint site.
1. Access Your SharePoint Page
First, navigate to the SharePoint page where you wish to add the People Hub Web Part. This could be your main intranet homepage or a specific departmental site.
2. Add the Web Part
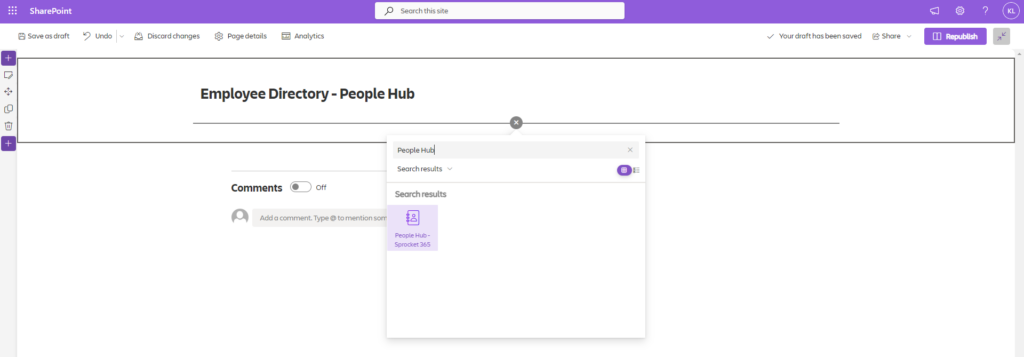
Click the plus icon on the page to add a new web part. In the search bar, type "People Hub" and select the People Hub icon that appears. This action will add the People Hub to your selected page.
3. Configure the Web Part
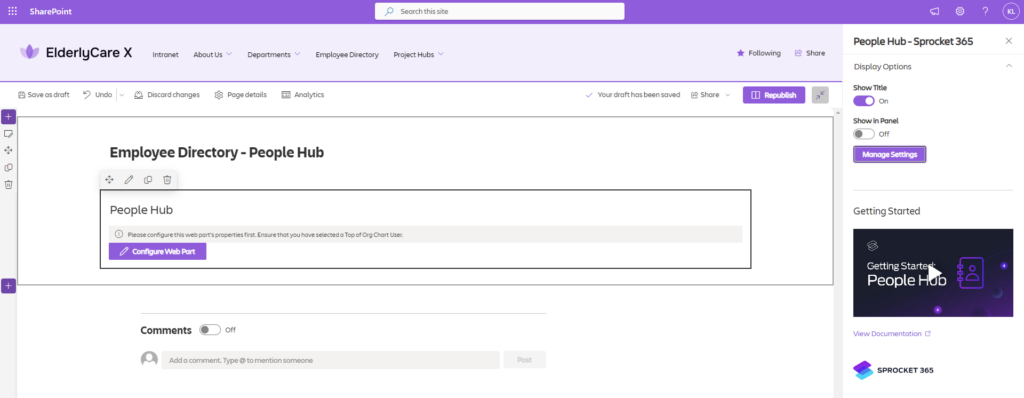
Once the People Hub is in place, click on either Configure Web Part or the Edit pencil icon. This action opens a configuration pane on the right-hand side of your screen.
- Visibility options: You can choose to show or hide the People Hub title and the Hub itself in a panel.
- Organisational settings: Click on Manage settings to open a window where you can configure all settings related to People Hub. Start by adding the individual at the top of the organisation chart, typically the CEO.
4. Customise Settings
Within the settings window, you can:
- Ensure that only individuals with a manager are displayed by enabling specific filters.
- Choose which contact details to show, such as job titles, departments, or exclude less necessary information like mobile numbers.
- Set display options like normal or compact mode and adjust the web part height to fit your layout.
- Enable or disable features like lazy loading, CSV export of the staff directory, or links to other internal tools like the Sprocket Location Finder.
5. Organisational Chart and Browser
Further down the settings:
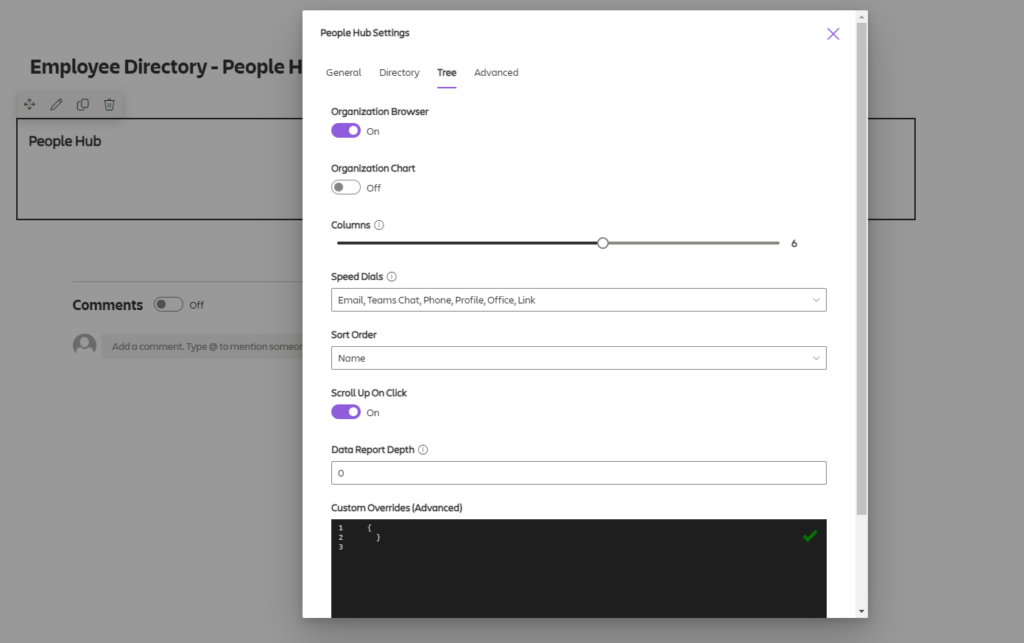
- Toggle the organisational browser and chart on or off.
- Specify the number of columns for display and sort order within the organisational chart.
- Implement any custom overrides or advanced settings required for your site, such as disabling links or adding data filters.
6. Review and Publish
After configuring the settings, close the settings window. If there are any alerts (such as unresolved manager links), they will typically be resolved once the page is refreshed or updated.
Finally, hit the publish button at the top right of your screen to make the People Hub live on your SharePoint page. Below is an example of what it automatically looks like!
Employee directory examples by industry
The same directory takes different shapes depending on the organisation. A few examples from Sprocket 365 customers:
- Healthcare. Hospitals and aged-care providers use the directory to find on-call staff quickly, filtered by department, ward or site. Photos matter here: in a large facility, knowing what a colleague looks like saves real time.
- Professional services. Law and accounting firms filter by practice area and office, so anyone can find the right specialist across locations in seconds.
- Government and education. Larger org structures lean on the full organisational chart view to make reporting lines and team boundaries visible to everyone.
- Multi-site organisations. Pairing the directory with the Location Finder lets staff jump from a person to their office location and back.
Frequently asked questions
Do I need a template to build an employee directory in SharePoint?
No. Because the People Hub reads from your Microsoft 365 profiles, there is no list template to download or populate. Add the web part, point it at the top of your org chart, and the directory builds itself from the data you already have.
Can guests or external users appear in the directory?
You control this with filters. Most organisations show only licensed internal staff, and service accounts or external guests can be excluded from the view.
Does it work on mobile?
Yes. The People Hub is responsive and works in the SharePoint mobile experience, so the directory is usable from a phone on the shop floor or between meetings.
Can we export the directory?
Yes. CSV export can be switched on in the settings, handy for audits, emergency contact lists or a printed phone list.
Final thoughts
Creating an employee directory on SharePoint offers numerous benefits to organisations. With this essential resource on your site, you successfully foster transparency and accountability, facilitate seamless collaboration and communication between employees, and help users be more productive, by saving valuable time.
There are numerous ways of creating an employee directory on SharePoint but using third-party software like Sprocket 365 is the best way to achieve a highly professional and sophisticated employee directory on SharePoint.
With Sprocket 365, you not only get a modern-looking employee directory but also have the avenue to customise your directory to fit your organisation's needs. The People Hub is one of more than 30 web parts included with Sprocket Studio.
Try Sprocket 365 free
Get started for free, available to try in the Microsoft AppSource. Sign up for a 14-day free trial and discover how to create a dynamic and functional Employee Directory in SharePoint.
No credit card required. Give it a try for yourself!
About the author
Trent Allday, Founder, Sprocket 365
Trent founded Sprocket 365 after years of building knowledge bases, intranets and digital workplaces on SharePoint with Sope, a Melbourne-based Microsoft partner.